Tuesday, December 28, 2010

Winter's STILL here....

...but I've made some progress on the small block chevy:

I've installed the heads (461 doublehumps from a '65 Corvette) and the intake (from a '68 Camaro).

The distributor is a neat unit called a "Power Fire" - and it's neatest feature is a little knob on the side that will allow me to advance or retard the timing in 1/2 degree steps without having to unbolt the dizzy. Neat eh?

I've got a new waterpump, pulleys, balancer, alternator + brackets all ready to go on it - and next week I'll probably pick up a nice chrome oilpan to round the package out.

I'm going for a nostalgia look (sort of)- so those are "corvette" script/finned valve covers- and the oil fill tube is on the intake (so I'm hoping I don't have a pvc issue.. if so I'll have to drill into the intake to fit a pvc valve, and there's not a lot of room to do that in. I'd rather not alter the covers that much.

The only real work left is fixing up the exhaust manifold- but I'm a little short on space so I'll work slowly.

So work really is progressing, just very very slowly :)

Friday, December 17, 2010

Winter's Here

Yes. I managed to fit a 16 foot car in a 15 foot garage. Space is tight, but the heater's on and it'll be warm enough to hopefully get the motor running this winter.

I've ordered the starter, alternator, waterpump, dizzy, and a bunch of other little bits and pieces, and I'll be hacking away at it.

I know... the updates to the blog are few and far between. Sorry. With a baby on the way, car time is being eaten up a bit.

Sunday, August 15, 2010

Peaked Hood Part Two

Since the last post, I finished welding the 1/4 round to the hood and cleaned up the welds. I then added fiberglass filler so that I could shape it into a peak. I've never done that before, but it came out really nicely!

I still have more sanding to do, it's not quite perfect where it meets the grille (but it's close). I also need to touch up where it meets the windshield - but you get the idea.

It's REALLY hot out - over 30 celsius - so I'm taking it really really slow - but I've ordered engine gaskets (to get the heads and intake installed), and brakelines + fittings etc. I'd like to get the thing sort of moving before winter. By sort of I mean that I need to be able to push it around. :)

Sunday, August 1, 2010

Peaked Hood Part One

So... No posts in 4 months and then two in one day. Wow! This post is a little heavy on the pics, and a little light on the text.

I had some spare time- the riding lawnmower died, so I had sort of nothing to do. Well, I should have fixed the lawnmower but... well, this was more fun.

I bent a 1/4" rod to the contours of the hood (that was kind of fun, actually. 1/4 inch bends a lot easier than 3/8ths or 1/2" rod) and once I was happy with the fit, I sanded-to-metal the hood and tack welded it in place.

I would have finished welding it, but I discovered my last spool was empty so I kind of had to stop. ha ha. I should have grabbed some more while I was out today, but now everything is closed so I'm stuck.

Tracee (my better half and soon to be mother of my child) and I were at odds - she would have like to retain the center strip and the hood bird, and I wanted to smooth the entire hood out.

So, this was my compromise - no hood bird, but the hood will be peaked (so it's still sort of smoothed, but also has the right feel)

I've seen a few customs here and there with this treatment - and I loved it.

So- on Tuesday on my way home I'll swing by 'the shop' and pick up a couple of spools of welding wire, finish welding the peak in and then grind, smooth, sand and fill until it's right.

Gives me something to do while I'm waiting for the driveshaft, anyway- and I'm sort of tired of trying to get the clutch linkage right. A break is just what the MD ordered.

Too long since I updated the site!

I've been very lax in updating the blog on my progress. However- I've gotten a lot done on the car! (I'd rather be turning a wrench than typing I guess).  Let's see what's been done.  My last post had me bolting together the front end.  I finshed that up and put the car back on the ground. Notice- it's already sitting lower, and that's without the motor/transmission in the car!

At this point I made my colour choice and took advantage of a sale- the car will be Cobalt Blue Metallic Pearl with a black roof. So I ordered the paint, primer, clear and basecoat. I also ordered some metal flake- I'll shoot a test panel later (probably the fall when the temperature is right) and see how it goes.

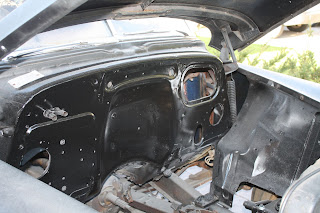
I had a bit of downtime - but not really enough to start a huge job, so I decided to do a little work on the firewall.  I knew that I needed to remove the firewall ribs and clean up some other parts, so I gave that a good start. 

With both ribs removed and a temporary coat of black paint on the firewall to protect it, I was happy with the results.

The firewall ribs are spot welded on - so if you're reading this about to start your own project- thoroughly sand and clean the rib joints, you'll be able to cut the ribs off quite easily once you see where the spots are.

At this point, I still wasn't quite ready to drop the motor (a 350) and transmission (a saginaw 4 speed), I had scheduled that for June or July. So I decided to start working on the body, starting with the rear quaters.  With my grinder with a flap wheel in hand, I started on the driver side. I knew it was where the most damage was, but I had no idea it would be like this...


Several conversations, a lot of climbing in, over, under and around the dented area, and a lot of advise later, I decided just to jump in.

With a cut off wheel, I surgically slit the crease (a relief cut) and started hammering away. my neighbours are very patient.  Not too long later, I'd gotten it back to a more normal shape-- not quite perfect but much much better.

This was actually a LOT of work, and a lot of great experience. At this point I made the decision to replace that entire section instead of stitch welding it back together. I knew I needed to patch the lower portion of the quater - it had been badly rotted out - but rather than try to repair the hundreds of tiny dents (stretching and shrinking the panel) it was just easier to replace the entire panel. I ordered a new panel from EMS Automotive, and a few days later it arrived. To my excitement, it's overall quality was wonderful.   So I pulled the axle - and a hit to anyone about to try this - bring a friend, two hyldraulic jacks, a piano dolly (the flat moving kind) and a comealong.

With the rear end out, I test fitted the panel and it fit wonderfully, so I welded it in and moved on to the rear section of the quater.

There was alot of hammer work involved where the quater wraps around to the tailpan - this car has obviously been hit - badly - but with persistance I was able to bring it back into shape. 
There's still more work needed back there, but I got enough done on this side that I could move over to the other side and replace the rusty parts there as well. (I was itching to get the rear end in, I hate having the thing up on stands like that.

I had a really hard time welding the other side for some reason- actually I'm just not that good at welding yet. I ended up warping the panel, and it took a bit of hammering it get it to come back. Even still, there's more filler on the passenger side rear than I care to admit.

The bodywork took me a LONG time, because I kept being inturrupted by the weather - It rained a lot this spring, and everytime it did I would need to recover the whole car. That's where the carport came from.

With the bodywork done I measured and drilled new pilot holes in the firebird rear end to re-center it and bolted it in with the camaro bottom plates I had.  My plan is to remove the plates and fabricate new ones or cut the camaro plates down so that the shock mounts will fit properly, but that's a project for another day.

Next, I moved on to the front end again. While I was doing the body work my steering column (flaming river) arrived, so I lined everything up and connected it.  Three u-joints ( the column and the Mustang II front end were an inch away from lining up). It took a bit of math, and a bit of trial and error- but it it ended up working very nicely.  I also installed the brake master cylinder - but I'm still working on the clutch linkage so I'll post a photo later.

Hey, here you can see the colour of the car will be too!


Before I assembled the column parts I finished cleaning up the firewall (with the fenders off) and I repainted it body colour.

What really surprised me is that I found a perfect match for the colour at canadian tire. At least I'll have touch up paint if I need it. 

And so, on one fantastically rainy day in June, I invited my nephew Russell over and we installed the motor and transmission.  It went in  very easy, no spills or chills of any kind.


Russell had a tonne of fun, it was a great experience for him.

I've been working off and on since then - but the heat has been insane up until a little while ago (35+ degrees not including the humidex). So I've not done very much that's visible in and around the Chevy.

As I mentioned, the brake master cylinder is in, and I've begun fabricating the clutch linkage and transmission mount. I'm also ready to re-install the front sway bar (it's just mocked up right now).

I also discovered that my math on the driveshaft was off- and it's 6 inches short. Fortunately, I was able to track down a replacement that is too long if anything.

When I had the fenders off one rainy day I stripped the driver's side and found it was in worse shape than it looked. Fortunately, I think I've found a pair of fiberglass front fenders thanks to a member on ChevyTalk. I'll let you know.

And maybe it won't be 4 months before I post again.


Sunday, April 4, 2010

Front End Done!


Well!

Today was a beautiful day, and I managed to finish the assembly on the front end. I still need to lube and then plumb and bleed the brakes, but NOW I can measure for the steering column/shaft and also start thinking about how best to yank out the transmission.

This was the most (and least) fun part of the build so far- those springs are scary to compress.

But I'm extremely happy with the results - and how much I've learned!

I'm also lovin' the end result:


That's awesome- I expect the springs to settle another 1/2 inch, and then the motor to weigh it down another inch and a half- which means the end result will be a nice low front end rake.
Next... Yanking out the rear end, torque tube and transmission... in ONE PIECE?!? (ha ha, I'll try!)


PS: I did publish a step-by-step photodiary on chevytalk.com ~ Click on the title of this post to view it!

Sunday, March 21, 2010


I had an awesome day today. Painted and prepped the crossmember and the upper/lower control arms and various parts.  The pics here were taken after the first coat, two coats went on in the end. It's just spray-bombed, but it'll suffice. 


Here's another view. If I had it to do over again... I would have pulled off all the front end metal. I ended up having to work around it way too much, and  removing the whole doghouse would have made life much easier. 


But I digress. Let's move on, shall we?


... So- after the paint dried,  I got the passenger side all buttoned up...


... and I moved on to the driver's side. Starting with the upper control arm ...


... followed by the lower control arm ...


... I then compressed the snot out of the spring, placed my floor jack under the lower arm and set it in place. At that point I mounted the spindle... 


... and then the disc brake bracket...


... followed by the rotor. There are two bearings - an inner and an outer - that need to be packed. Then a light tap seats the rotor right onto the spindle....


... and once that was done, I could mount the caliper. It's important to bench-fit everything before hand, some of these are a bit of a tight fit. Finally, put the dust caps on and that's it 


Well, more or less. If you've got common sense and plan everything out, you're golden. 

Check out the unsprung ride height: 

 
Keywords: Chassis Engineering Mustang II M2 Heidts IFS Install 

Now... on to the REAR END!

Saturday, March 20, 2010

Chassis Engineering Mustang II Crossmember Install - Part One

Isn't it amazing how a few hours turns into the whole day? 

Powered up the compressor and got my air chisel out. There's a little bullhorn bracket on either side that has to come out. It was a bit stubborn, but once I'd woken up the neighbours they both came out. 

Next, I test fitted the crossmember. Actually, I drove over to my buddy John's place and borrowed another 2 pairs of stands and a bigger jack. Mine is just too small. Anyway, I was ready to go, so I went ahead and lifted the crossmember into place and put the hats on. And... wow... it was NOT a perfect fit, and I really had to play with it to get it to sit right. Reason, is that we're dealing with a 61+ year old car. It was only off by about 1/4 inch side to side. 

I marked the holes and drilled out the new holes and enlarged the ones reqired. You've GOT to do this before you start bolting it in - because the two inner rear bolts will NOT be accessable to a drill once the tophats are on. 


Once the crossmember and top hats were in place, I passed the drill back through all of the holes, to clean them up. Then, bolt, lockwasher, locktite and the bolt. Torquewrench and... 

voila!


I need to give it another coat of paint, and now that the crossmember is done, I'll be pulling the lower rad support and the old swaybar (I have a new one). 

There's still a TONNE of work to do, but I[m happy with the progress so far. 


Tomorrow, I'll probably try to get the control arms painted and installed. Woohoo!

PS: DISCLAIMER- I don't know what I'm doing, I'm learning and making it up as I go along. Would NOT have been able to do this without the guys on ChevyTalk.com

Friday, March 19, 2010

It's Spring!


Whew! Winter is over. Sort of. We've had a run of great weather so I dove in and started working. But first...


Over the course of the winter I've picked up a few parts- new master cylinder and underfloor pedal assembly, new rear end (3.11 POSI!) and other smaller parts and pieces. The winter was spent planning, dreaming and scheming.


Last weekend, I found the time to pull the steering column out. That was a good start.


So- with the good weather today, I finally tore into the front end of the Chevy - and nobody was more surprised than I, when 2 and 1/2 hours later the entire front end was out of the car.


Tracee got some really nice pics while I was "concentrating". Thanks Sweetie! 


You'll notice that I did not pull the fenders or front end to do this work. Instead, I cut 4 inches out of the inner fenderwells which allowed me to access the bolts. I had some funky stuff happening (a weirdly and crudely fabricated battery box, holes and a bit of rust bolts frozen solid, that sort of thing).

I decided it would be easier (for now) to leave the fenders and front end in place. It will eventually come out, but I need to get the beast rolling again quickly. I don't like leaving it in the driveway wheelless anyway- so within the next couple of weeks the Mustang II front end will be seated, and hopefully I can set the motor and transmission in so I can fabricate the transmission mount.  


While I was in there (literally!) I started grinding down the firewall ribs and cleaning things up. I must have been tired though, I kept shredding cutting disks. I'll continue tomorrow. Yes, there will be more pictures as I progress further!